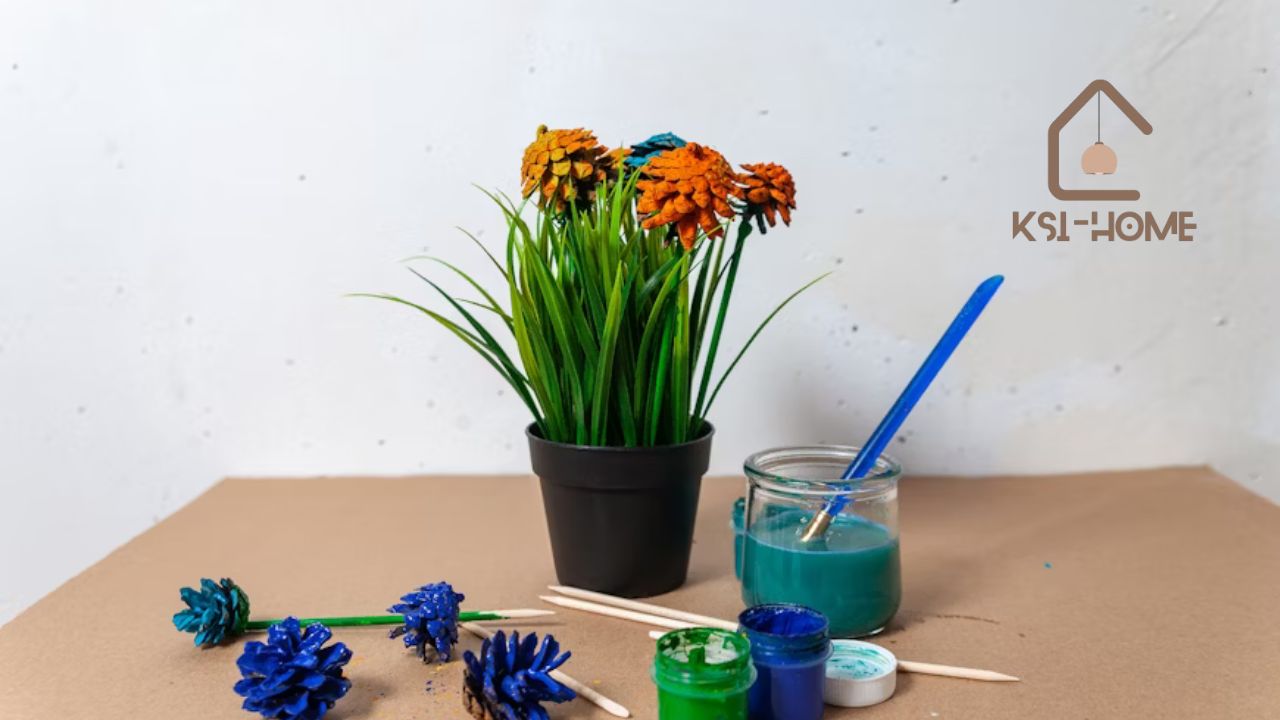
Crafting offers a wonderful escape, and creating beautiful pipe cleaner flowers is one of the most delightful and accessible projects you can undertake. This simple, affordable hobby allows you to craft stunning bouquets that never wilt, bringing a splash of everlasting color into your home. Whether you’re a seasoned crafter or a complete beginner, you’ll find immense joy in twisting these fuzzy sticks into vibrant floral arrangements.
This guide will walk you through everything you need to know about making pipe cleaner flowers. We will explore the necessary materials, step-by-step instructions for various flower types, and advanced techniques to make your creations truly stand out. Prepare to unlock a new world of creativity and fill your space with your own handmade blossoms.
Quick Guide to Making Pipe Cleaner Flowers
| Craft Details | Description |
|---|---|
| Focus Project | Pipe Cleaner Flowers |
| Difficulty Level | Easy to Intermediate |
| Primary Materials | Pipe Cleaners (Chenille Stems), Scissors |
| Optional Materials | Floral Wire, Floral Tape, Beads, Pliers |
| Time to Complete | 5-20 minutes per flower |
| Best For | All ages, family activities, DIY decor |
Why You’ll Love Making Pipe Cleaner Flowers
The appeal of pipe cleaner flowers lies in their simplicity and versatility. Unlike other crafts that require a significant investment in tools and materials, you can start making beautiful creations with just a pack of pipe cleaners and a pair of scissors. This makes it an ideal activity for children, adults, and everyone in between.
The tactile nature of bending and shaping the soft chenille stems is incredibly satisfying and even therapeutic. It’s a low-pressure craft that encourages experimentation. There’s no right or wrong way to make pipe cleaner flowers; each one you create will have its own unique charm. Plus, the final product is a durable and cheerful decoration that can be used in countless ways.
A Craft with a Surprisingly Rich History
While pipe cleaners were originally invented in the early 20th century for, well, cleaning pipes, their potential as a craft material was quickly recognized. Their pliable wire core and soft, colorful fuzz made them perfect for creative projects in schools and homes. The art of making pipe cleaner flowers became particularly popular in the mid-20th century as a fun, accessible hobby.
Today, this craft is experiencing a major resurgence, thanks in large part to social media platforms where crafters share their incredible floral designs. From simple daisies to complex, multi-petaled roses, the possibilities are endless. This renewed interest has elevated the craft from a simple children’s activity to a legitimate art form, with creators pushing the boundaries of what can be achieved with this humble material.
Getting Started: Your Essential Toolkit
Before you dive into creating your first bouquet, let’s gather the necessary supplies. The beauty of this craft is its minimal barrier to entry; you likely already have some of these items at home.
Core Materials
- Pipe Cleaners (Chenille Stems): This is your main material. They come in a vast array of colors, lengths, and thicknesses. For beginners, a standard multi-color pack is a great starting point. As you advance, you might seek out specific shades or metallic varieties for more sophisticated pipe cleaner flowers.
- Scissors: A sturdy pair of scissors is needed for trimming the pipe cleaners to the desired length. Wire cutters can also be helpful for thicker stems but are not essential for standard pipe cleaners.
Optional but Recommended Supplies
- Floral Wire and Tape: For creating more realistic and sturdy stems, green floral wire wrapped in green floral tape is a game-changer. This gives your pipe cleaner flowers a more professional and polished look.
- Pliers: A small pair of needle-nose pliers can be incredibly useful for making tight bends, curling ends, and securing pieces together, especially when working with intricate designs.
- Beads or Small Pom-Poms: These are perfect for creating the center of your flowers, like the pistil of a lily or the fuzzy middle of a daisy.
- Ruler or Measuring Tape: For those who prefer precision, a ruler will help you cut your pipe cleaner pieces to uniform lengths, ensuring your petals are all the same size.
- Vase or Pot: Once you’ve created a collection of pipe cleaner flowers, you’ll want a beautiful vessel to display them in!
Basic Techniques for Every Aspiring Florist
Mastering a few fundamental techniques will open the door to creating a wide variety of pipe cleaner flowers. Practice these simple folds and twists, and you’ll be ready to tackle any project.
The Petal Fold
This is the most basic building block for most flowers.
- Take a single pipe cleaner.
- Fold it in half to find the center.
- Bring both ends to the center point, forming two loops or “petals.”
- Twist the ends together at the base to secure the shape.
The Coil Technique
This is used for creating the center of flowers like sunflowers or for making coiled roses.
- Take one end of a pipe cleaner.
- Begin tightly rolling it in on itself.
- Continue rolling until you reach the end, forming a flat, snail-shell-like coil.
Creating Stems and Leaves
A simple green pipe cleaner works perfectly as a stem. To add a leaf, take a shorter piece of a green pipe cleaner, fold it into a leaf shape (pointed at both ends), and twist it around the stem. For a more realistic look, you can wrap a piece of floral wire with green floral tape and attach your pipe cleaner flowers to that instead.
Step-by-Step Guide: Your First Pipe Cleaner Flowers
Let’s start with a few simple yet stunning flower designs. These projects are perfect for beginners and provide a fantastic foundation for your new hobby.
How to Make a Simple Daisy
Daisies are cheerful and easy to make, making them an excellent first project.
Materials:
- 6 white pipe cleaners for the petals
- 1 yellow pipe cleaner for the center
- 1 green pipe cleaner for the stem
Instructions:
- Create the Petals: Take each of the six white pipe cleaners and form a single loop, twisting the ends together at the base. You will have six individual petals.
- Form the Center: Take the yellow pipe cleaner and coil it tightly into a flat circle. This will be the center of your daisy.
- Assemble the Flower: Arrange the white petals around the yellow center. Push the twisted ends of the petals through the back of the coil to secure them.
- Attach the Stem: Take your green pipe cleaner and twist one end securely around the base of the assembled petals. This completes your first of many pipe cleaner flowers!
How to Craft a Beautiful Tulip
Tulips have a distinct, elegant shape that is surprisingly easy to replicate.
Materials:
- 3 pipe cleaners of the same color (e.g., red, pink, or yellow) for the petals
- 1 green pipe cleaner for the stem and leaf
Instructions:
- Shape the Petals: Take one of your petal-colored pipe cleaners and find the center. Fold it into a “U” shape. Gently pinch the bottom of the “U” and twist the two ends together at the top to create a pointed petal shape. Repeat for all three pipe cleaners.
- Combine the Petals: Group the three finished petals together. Use a small piece of a spare pipe cleaner (or one of the petal ends) to twist them together at the base.
- Create the Cup Shape: Gently bend and arrange the three petals to form the characteristic cup shape of a tulip.
- Add the Stem: Twist the green pipe cleaner around the base of the petals. About halfway down the stem, create a leaf by making a long, pointed loop and twisting it onto the stem. You now have a gorgeous tulip to add to your collection of pipe cleaner flowers.
User Reviews and Community Feedback
Crafters who have embraced making pipe cleaner flowers often share overwhelmingly positive feedback. On crafting forums and social media, the consensus is clear.
- Sarah K. (Rating: 5/5): “I started making pipe cleaner flowers with my kids, and now it’s my go-to relaxation activity! It’s so affordable and the results are surprisingly beautiful. We’ve made bouquets for all their teachers.”
- David L. (Rating: 4.5/5): “As someone who isn’t ‘naturally’ crafty, I found this hobby incredibly approachable. The instructions online are easy to follow, and you can’t really mess it up. It’s a fantastic confidence booster.”
- Maria P. (Rating: 5/5): “I’ve started selling my advanced pipe cleaner flowers at local markets. People are amazed by the intricate designs you can make. It’s a wonderful side hustle that brings a lot of joy.”
Advanced Techniques: Elevating Your Craft
Once you’ve mastered the basics, you can move on to more complex and realistic designs. These techniques require more patience but yield truly breathtaking results.
Creating Multi-Layered Roses
A realistic rose is the holy grail for many pipe cleaner flowers enthusiasts. This method uses multiple layers to create a full, blooming effect.
Materials:
- 8-10 pipe cleaners in your desired rose color
- 1 green pipe cleaner for the stem
- Pliers (recommended)
Instructions:
- Create the Rosebud Center: Tightly coil one pipe cleaner around the tip of your pliers to form a small, tight bud. Slide it off.
- Form the Inner Petals: Take three pipe cleaners. For each, create a simple looped petal, but make them slightly smaller and tighter than you would for a daisy.
- Attach Inner Petals: Wrap these three petals around the central bud, staggering them to look natural. Use the ends of the petals to twist them securely at the base.
- Form the Outer Petals: Take the remaining 5-6 pipe cleaners. Create larger, wider looped petals. You can even gently bend the tops outward to mimic the look of a blooming rose.
- Attach Outer Petals: Layer these larger petals around the inner set, continuing to secure them by twisting the ends at the base.
- Final Touches: Attach the green stem by twisting it firmly around the consolidated base of all the petals. You can also add green sepals by twisting short green pieces at the base of the bloom. This method creates stunningly realistic pipe cleaner flowers.
Crafting Delicate Lavender Stems
Lavender’s unique structure can be beautifully replicated with a simple wrapping technique.
Materials:
- 1 purple or blue pipe cleaner
- 1 green pipe cleaner (or floral wire)
Instructions:
- Prepare the Stems: Hold the purple and green pipe cleaners parallel, with the green one extending about two inches lower than the purple one (this extra length will be your stem).
- Begin Wrapping: Starting from the top, tightly wrap the purple pipe cleaner down and around the green one.
- Create Texture: As you wrap, occasionally make the wrap a bit looser or create a tiny loop to mimic the clustered florets of a lavender plant.
- Secure the End: Continue wrapping until you have about two inches of the green stem left at the bottom. Tightly twist the end of the purple pipe cleaner to secure it. You can make several of these to create a lovely lavender bundle.
Beyond the Basics: Finding Your Creative Flow
The world of crafting is vast, and inspiration can come from unexpected places. When you’re making your pipe cleaner flowers, don’t feel limited to just one hobby. Think about how different skills and materials can intersect.
For example, a woodworker might build a custom planter box to display their partner’s handmade pipe cleaner flowers. A painter might use a bouquet as a still-life subject. Even tasks from completely different domains can spark ideas. Someone detailing their car, for instance, might use a mass air flow sensor cleaner with precision and care. That same focus can be applied to the intricate twists of a flower petal.
The process of cleaning can also be a source of inspiration. After a big outdoor project, using a powerful concrete cleaner reveals the pristine surface underneath. This transformative act is similar to how a simple pipe cleaner is transformed into a beautiful work of art. The clarity achieved after using a good glass cleaner on a window can be compared to the moment a new floral design idea becomes clear in your mind. Don’t be afraid to draw connections from all parts of your life to fuel your creativity with pipe cleaner flowers.
A Personal Journey into Crafting
For many, crafting is more than a hobby; it’s a part of their identity. Take the story of “Crafty Clara,” a popular online personality known for her incredible pipe cleaner flowers. She began crafting as a way to de-stress from a high-pressure corporate job. What started as a simple activity to keep her hands busy quickly blossomed into a full-fledged passion.
She began sharing her creations on social media, and her unique designs and easy-to-follow tutorials gained a massive following. Today, her blog and video channels are a primary source of income. While a “net worth” in the traditional sense is private, her success is evident in her thriving online business, which includes selling custom bouquets, DIY kits, and digital patterns. Her story is a testament to how a simple, joyful hobby can transform into a fulfilling and profitable career. She proves that with dedication, your own stunning pipe cleaner flowers could be more than just decoration.
Displaying and Caring for Your Creations
Once you have a beautiful collection of pipe cleaner flowers, you’ll want to show them off. Here are some creative ideas for displaying your handmade treasures.
- Classic Bouquet: The most obvious and beautiful way is to arrange them in a vase. Mix different types and colors of flowers for a vibrant, eclectic look.
- Wreaths: Weave your pipe cleaner flowers into a simple grapevine or wire wreath form for a stunning piece of door or wall decor.
- Gift Toppers: A single, beautifully crafted flower makes a memorable and personal alternative to a store-bought bow on a wrapped gift.
- Wearable Art: Attach smaller flowers to hair clips, headbands, or pins to create unique fashion accessories.
- Shadow Boxes: For your most intricate and prized creations, consider displaying them in a shadow box to protect them from dust and damage.
Caring for your pipe cleaner flowers is incredibly simple. They are far more durable than real flowers. To clean them, simply give them a gentle shake or use a can of compressed air to remove any dust. Avoid getting them wet, as this can cause the wire to rust and the dye to potentially run. With minimal care, your flowers will stay bright and beautiful for years to come.
Troubleshooting Common Crafting Issues
Even with a simple craft, you might run into a few snags. Here’s how to handle common problems when making pipe cleaner flowers.
- Problem: My petals are uneven and floppy.
- Solution: You might be making your loops too large for a single pipe cleaner. Try using a shorter length for each petal or double up the pipe cleaner by folding it in half before shaping to create a sturdier petal.
- Problem: My flower head is wobbly on the stem.
- Solution: The connection isn’t tight enough. When attaching the stem, make sure you twist it very securely around the base of the petals at least 3-4 times. You can also add a small dab of hot glue for extra stability.
- Problem: The colors I want aren’t available in stores.
- Solution: This is where online craft suppliers shine. Websites dedicated to crafting materials often have an enormous range of colors, including nuanced shades and specialty finishes like glitter or metallic. This is where you can find the perfect hues for your next pipe cleaner flowers project.
Expanding Your Hobby: The Crafting Community
One of the best parts of any hobby is sharing it with others. The pipe cleaner flowers community is incredibly active and welcoming online. You can find groups on social media, forums, and video-sharing platforms dedicated to this craft.
Joining these communities is a fantastic way to:
- Get inspiration for new flower types and designs.
- Ask for help and advice when you’re stuck.
- Share your own creations and get feedback.
- Participate in challenges and craft-alongs.
Don’t be shy about sharing your work, even as a beginner. The positive reinforcement and sense of camaraderie can be a huge motivator to continue growing your skills and enjoying the art of making pipe cleaner flowers. The community is a rich source of patterns and innovative techniques.
Final Thoughts: The Enduring Charm of a Simple Craft
In a world that often feels complex and fast-paced, there is profound joy in a simple, hands-on activity. Making pipe cleaner flowers is more than just twisting fuzzy sticks; it’s an act of creation that is accessible, affordable, and deeply rewarding. It’s a chance to slow down, focus your mind, and produce something beautiful with your own two hands.
Whether you make one simple daisy or an entire garden of intricate roses, the process itself is a gift. The vibrant, everlasting bouquets you create are just the beautiful bonus. So, grab a pack of pipe cleaners, let your imagination bloom, and discover the delightful art of crafting your very own pipe cleaner flowers.
Frequently Asked Questions (FAQs)
Q: Are pipe cleaner flowers safe for kids to make?
A: Absolutely! It’s a fantastic craft for children, as it helps develop fine motor skills. Just be sure to supervise younger kids, as the ends of the pipe cleaners can be a bit sharp. An adult should handle any cutting.
Q: Where is the best place to buy pipe cleaners for making flowers?
A: You can find basic packs at most craft stores, department stores, and even dollar stores. For a wider variety of colors, thicknesses, and textures for more advanced pipe cleaner flowers, I recommend checking out online craft suppliers.
Q: How do I make my pipe cleaner flowers look more realistic?
A: The key is in the details. Use floral wire and tape for the stems, add small beads for the center of the flowers, and study real flowers to replicate their petal shapes and layers. Creating subtle bends and curves in the petals, rather than keeping them perfectly flat, also adds a lot of realism.
Q: Can I sell the pipe cleaner flowers I make?
A: Of course! Many crafters sell their pipe cleaner flowers online, at craft fairs, and in local markets. Custom bouquets for events like weddings or parties are also a popular item. Just be sure to price your work to account for both materials and your valuable time.
Q: My hands get tired when I’m twisting a lot of pipe cleaners. Any tips?
A: Taking breaks is important! Also, using a small pair of needle-nose pliers to help with the twisting can save your fingers a lot of strain, especially for tight connections at the base of the flower. It allows you to get a better grip and more leverage.
Q: I feel like my flowers are missing something. What can I add?
A: Think about the little things! Adding leaves to your stems makes a huge difference. You can also try mixing different textures, like adding a glitter pipe cleaner into a bouquet for a pop of sparkle. Another idea is to lightly scent them with a floral essential oil. It enhances the illusion of your lovely pipe cleaner flowers.
Admin Recommendation
Laying the Foundation for DIY Home Improvement Success